I thought I’d try to get back into blogging while I still can. I’m now 37 weeks pregnant, which is called full-term, and the baby could be born any time now (though they say most first babies don’t arrive early). So here are some of the things I am thankful for this week:
Making it to full-term
Whenever anything seemed abnormal in our pregnancy I got worried about the baby’s safety. I’m so glad that we’ve reached full-term now and the baby can be born with minimal complications. Now it’s just a waiting game!
Skills to make gifts
We went to a one year old’s birthday party on the weekend and I made her some crochet shoes (oops, I should have taken a picture). I have often loved receiving handmade gifts from people and I love being able to do the same. At the moment, it’s also easier for me to make a gift than walk around the shops trying to find something, so that’s a double win there. I’m thankful for the brain that God gave me to be able to learn skills such as crochet, and hands with the ability to do such things.
My husband
This week I’ve had swollen feet, a sore back, tired limbs and J has been wonderful to me through it all. He massaged my feet and back, let me sit when I needed to and took over things such as the dishes so I could rest. As my capacity to do things has decreased J has stepped up, even at a time when he’s gearing up to start college in less than two weeks and has a lot of work to do before that. I’m so thankful for his love and care for me, now more than ever.
What are you thankful for this week?
Showing posts with label craft. Show all posts
Showing posts with label craft. Show all posts
Thursday, 11 February 2016

Thursday, 29 October 2015
Thankful Thursday
Here are some of the things I am thankful for this week:
A new pillow
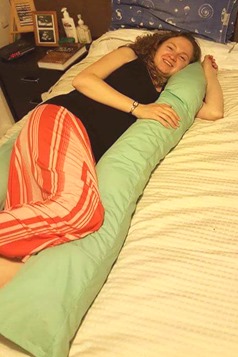
My parents were here over the weekend and we spent a lot of time with them, which was lovely. We went out to dinner with them a number of times, J and Dad played golf, Mum and I went shopping, I drove them to a quilting shop Mum really wanted to visit. One of the fun things I did with Mum was to make a pregnancy pillow. I'm normally a back-sleeper so switching to sleeping on my side has been a bit of an adjustment. I'd seen a few patterns on the Internet, but I already had a bit of an idea of what I wanted. I'd been sleeping with two extra pillows, one at my front between my knees and supporting my stomach, and the other at my back. But they were a bit flat and meant I took up a lot of room in the bed much to J's dismay. So I knew I wanted something to support my front and back, that was narrower and plumper than a normal pillow. Mum and I had fun making it up as we went along and here is the result. I am now, usually, sleeping much more comfortably (except for sore hips!).
Community living
I've said it before, but I love living in this community of Christian student families. This week I'm thankful that I can borrow things (like a sewing machine for that pillow!) and I can shoot out strange requests and the odds are that someone can help me. This week I need egg cartons for the craft at kid's club so I sent out an email to our community and got about five replies from people who had heaps of egg cartons! I had so much more than enough, thank you community!
What are you thankful for this week?
Thursday, 1 October 2015
Thankful Thursday
Here we are again at Thursday. Sometimes I can’t believe how fast the week goes. This week has been a bit up and down for me, but I know that there are still things I can be thankful to God for through it all.
A chance for some crafting
On Saturday we had the college Spring carnival. It’s kind of an excuse to have lots of people at college for Open Day, which happens at the same time. It’s lots of fun, particularly for families: there’s face painting, balloon animals and a jumping castle. One of my favourite things is the cake competition because after the judging you can buy slices of cake for a dollar and try them all. Unfortunately I was too full from my lunch to try all the cakes, and I stupidly didn’t make good use of the fact they had take-away containers available. Oh well, it’s probably better that I didn’t.
Spring carnival also has a lot of stalls, populated and run by students. Lots of these things are handmade so when I got home that afternoon I was inspired to do some craft myself. I made a whole bunch of earrings, did a bit of crochet, and fixed a hole in one of J’s pockets! Very industrious!
Calming colouring
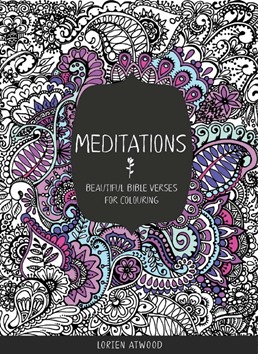
On Sunday I (officially) started some adult colouring. It’s a bit of a trend at the moment, that has really take flight. I’ve seen lots of adult colouring books in stores and seen it mentioned on the internet. A couple of weeks ago I ordered a special colouring book as a gift for a friend (and I got one for me too!). One of my fellow students put me onto it actually. His sister-in-law created this book as a way to meditate on verses from the Bible as you colour in the patterns she has drawn around them. The book is called Meditations and you can find it here.
This afternoon I was feeling anxious so I did a bit of colouring and it really helped me to calm down and remember God’s goodness. Last night as I did a bit of colouring before bed I used it as a time to pray for others. I love how colouring gets you to stop and wind down and how this book in particular gets you to focus on God and his word as you do it.

The Library Box
Third year had an assignment due last night (which I submitted at 10:30pm, woo hoo! just within my acceptable bed time limits if I race). I had at least ten books to return this morning. Now, since there’s a big construction site at college the library has moved a few hundred metres down the road. That doesn’t sound that far… I’m going to look up how far it is.
Haa! Yes, it is only 300 metres. I probably had to walk further to get to the uni library when I was studying at uni.
Aaanyway, I didn’t want to take them all the way to the library. Thankfully there is a library returns box on campus so I could just tip all my books in there this morning before chapel. Thank you library box!
What are you thankful for this week?
Thursday, 17 September 2015
Thankful Thursday
I’ve been sitting at home this afternoon waiting for it to rain. The weather forecast predicted a lot of rain today but I’m yet to see any of it! I’m glad that I made it home while it was still dry. Here are some things I’m thankful for this week.
It’s my birthday!
It’s my birthday today! I have to admit that I often feel a bit strange on my birthday. More people talk to you than normal, saying ‘happy birthday’ and doing nice things. I’m not used to the extra attention and I’m not really sure how to react to it. But I have enjoyed the love that friends and family have shown me. I’m thankful for these people.
Quick crafts
On Monday I started a crochet project and I finished it today. It was for a sock bun, I found the pattern here. It was basically a large square that I rolled up and sewed together. I haven’t tried it out yet but I’m looking forward to it. I’m not sure how curly hair goes in a sock bun but I figured this would be a cheap way of trying it! I’ll let you know how it goes.
Rebuke and encouragement
There have been a number of instances in the past two weeks when I have felt rebuked about my Bible reading and prayer habits, but particularly prayer. A lecture two weeks ago, a small group that I led and a chapel sermon. I’ve been encouraged to get back into the habit, and though it has been slow, I have been more regular than before. I’m thankful for these painful reminders and the motivation they produced in me.
I’ve got to stop there are get ready to go out for my birthday dinner!
Wednesday, 9 July 2014
Learning an old skill
I don’t know if people say that knitting is dying out. I sometimes wonder if old ladies think that it is. It kind of seems like it’s something that only grandmas do: they knit little booties and bonnets for their baby grandchildren. But I’ve seen enough young women knitting to know this isn’t true.
There are a number of women at college who knit: beanies, scarves, gloves. And finally, they have inspired me. I’ve decided to learn to knit.
While back home I asked my mum to teach me to knit. I'd learn before, as a child, but it never really went anywhere. I think I only ever knitted one square.
Here's my practice knitting.

Now I've decided to knit an infinity scarf. But I haven't decided what stitch to use. I'm hoping to get some advice from my knitting friends.
I know that knitting isn’t dying out, but I sometimes wonder about other ‘old skills’. I remember a pin lace artist telling me that she thought her art was dying out. What beautiful skills are we leaving forgotten because of our fast-paced, consumerist, machine-enabled culture? It makes me sad to think about knowledge that has been lost or forgotten.
Now I know learning knitting doesn’t really change anything. If I really wanted to continue the knowledge of a dying art perhaps I should have tried pin lace. But I do enjoy the feeling of accomplishment from learning the skill of knitting and I’m looking forward to having made something with it. I won’t have relied on a machine, or someone else, to make me something. And that makes me feel a little better.
Monday, 30 September 2013
Procrasti-crafting: Earring holder
This afternoon when I got home from college I was very distracted. Instead of working on my Old Testament essay which is due at the end of next week, I decided to do some craft.
I’d been wanting to make an earring holder from a photo frame for a while but hadn’t really looked into how to do it. Perhaps when I looked into it today was the beginning of my distraction.
One that I looked at suggested using a staple gun to fix some burlap onto the back of a frame. I don’t know about you, but I don’t have a staple gun lying around. But I had some cheap IKEA frames that I got from a quiz night and thought I could at least try using a normal stapler. The worst that could happen would be breaking the stapler.
Some other earring holders I’d looked at used lace strung across the frame. I had some lace left over from the wrapping from our wedding presents (I kept all the ribbons) that I thought would be perfect for this project. Here’s what I used to make my earring holder:
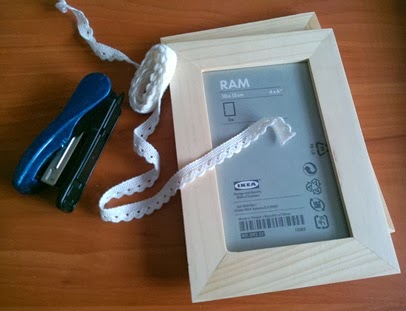
I took out the back of the frame and the plastic photo protector in front so I had just the frame. I stapled the lace to the back of the frame, doing the high sides first and then the inner edge so that the lace would be tight across the frame.

Here it is up close:

The wood was surprisingly and pleasantly easy to staple into. Well, on one side. This was the nice side. The other side wouldn’t let the staples go in straight and I think I wasted a whole unit of staples trying to do that side. They weren’t all pretty in the end, but I added some glue over the staples for good measure. I can’t guarantee that all IKEA photo frames will work for this project, so don’t say I didn’t warn you.
Here’s the finished product. I’m very happy with it.

I made this one for my studs so I used a lot of lace and stapled the strands close together. I’m thinking of making another one with bigger gaps between the lace for some of my dangly earrings. You could also paint the frame if you wanted to.
Now that’s done, I should get back to work!
Tuesday, 3 September 2013
Saturdays are for craft: Material Flowers
Saturdays are great. We take Saturdays off from everything; college work, other work... Actually that's not strictly true. I have done some house work on a number of Saturdays. Often Saturdays are washing day, and sometimes I clean the house on Saturdays too because I often don't want to use study-time as cleaning-time.
This Saturday we did do a bit of work. We had a working bee with the other college students who live around us. We do odd jobs around our houses and in the gardens and common spaces. J did a lot of mulch moving and I was involved with fixing up the sandpit. After shovelling out all the sand we fixed up the lining on the bottom and then sifted all the sand back into the sandpit. That’s right, sifted. We strung up the sandpit cover (made of shade cloth material) using the poles of the shade cloth that covers the sandpit and filtered sand through it by swinging the cover back and forth.
After the morning I didn't really feel like doing any other 'work' like hemming some pants or filling out psych application forms. So I did some craft.
I've been wanting to try out these flowers for a while, that I found on Pinterest. I've now made two, and I decided to document the second one I made. This was fun and satisfying. I haven't done anything crafty in a while and It makes me think I really should do it more often.

The details of how to make these flowers are here, but I did a few things differently so I thought I'd share how I did it. The main difference was that I sewed mine, and while the tutorial does suggest this as an option, she used glue so I thought it would be worth showing how I made these flowers by sewing. Glue is obviously faster than sewing, but I don't have a hot glue gun and I didn't want to have to hold and wait for runny glue to dry. Plus, I find sewing relaxing in some way and I feel like I would have more control than with glue.
You start with cutting out nine flower shapes from some t-shirt material.


Cut out a circle of felt in a similar colour (I didn’t have orange so I had to go with yellow). Because it will be on the back it doesn’t really matter because it won’t show.


Then you have to fold the flowers to make a ruffled or layer petal look. Fold a flower in half, and then in half again.


Then you attached the folded flower to the circle of felt. I just stitched along the edges of the fold so that the petals could lift a bit (more on this later).

As I added folded flowers I continued with the same bit of thread, working along the folds.

After this you add a second layer of folder flowers, but off-set from the first later by a 45 degree turn. The picture should explain it.

Here I've now completed two layers (though you can't really tell). Sewing the second layer was tricky. I didn't want to sew all the way through the bottom layer of petals (that's a lot of material to go through) so I tried to sew it onto the top flap of the petal. This is a bit tricky but manageable. The whole thing isn't as rigid as you might think so you can do a bit of bending to get the needle in underneath the petals you're sewing on.

Now you make the central petals. This bud is made by folding a flower in half (once, not twice this time) and rolling it up along the fold. I rolled it so it was a bit of a cone shape, the pointy end being where the fold is.

This bud then gets put into the middle of the petals you've sewed on so far. I'll admit that at this stage, glue would have been far easier. But soldier on!
I didn't do this, but in hindsight it might be best to sew through the bottom of the bud to hold the whole thing together before sewing it onto the other petals. Mine kept unrolling (a problem I didn't have with the first one, go figure) as I was trying to sew it in.
Once you have it attached then comes the final stages in making this pile of petals look like an actual flower!
Sew the top layer of petals up onto the bud, as pictured below. How much of this attaching you do is really up to you and your flower. If it looks like there are gaps, or the petals need some fluffing up then attach some petals with a little stitch. Glue might also be easier here, but I felt like I had more control with the stitches.

I also sewed the edges of the petals together from the back because I found that they were a bit flappy and left obvious gaps between them. This isn't a necessary step, you decide what to do based on how yours turns out.

There it is, the finished product! I sewed a little loop on the back to put a bobby pin through so I could wear it in my hair. You could also glue it onto a headband, hang it from a necklace or glue a brooch pin on the back.
If you do make one, let me know how it goes!
Subscribe to:
Posts (Atom)